

Before we can start learning MySQL, it's good to download & install it in your own system for first hand practicing.
If you are working in Windows then you can download & install MySQL for Windows or if you want to experience the most common real world scenarios, you can install Virtual Machine with Linux and install MySQL under it.
To download MySQL you can visit MySQL download website. On the Website you will find 2 editions of MySQL,
MySQL Enterprise Edition
MySQL Community Edition
The MySQL Community Server is the same as the MySQL Enterprise Server but the MySQL Enterprise Server has the following additional modules and programs compared to the MySQL Community Server:
The MySQL Enterprise edition is a commercial product and it's meant for businesses who want to use it for commercial purposes. The Community Edition is free edition which comes with GPL license and this is what we need to download
To download MySQL Community Edition please do the following.
Go To MySQL downloads page by clicking the following link
You will then be presented with various MySQL Edition, please choose the Community Edition which is at the end of the download page, as shown below

Click on Community (GPU) Downloads. Then you will get to the community downloads page. Click on Community Server link

Then you will see a page similar to shown below.
There are two options shown here, You can either download the Zip file or download the Windows MSI installer. The zip file is used to manually install and configure MySQL and it's meant for experienced users. Whereas, MSI installer will install and configure the MySQL database for you.
We will download the MSI installer, so click on "Go To Download Page link" beside MSI installer

MySQL MSI installer comes in two versions,
MySQL Web community Installer
MySQL Community Installer
The Web community installer is online installer i.e. you will need to be connected to the internet in order to install the product. Whereas, MySQL Community installer is offline installer which doesn't need internet connection for installation.
We will download the offline installer so please click on the download link as shown below

You will need to login if you have already have an account with Oracle. Or you can register free with Oracle first before you can download it.

After logging in you will get a Download button to start the download. Click on this button to start the download of MSI file

Once you have downloaded the MSI file for example "mysql-installer-community-5.7.21.0.msi" double click on it to start the MySQL Setup program.
In Windows MySQL installer requires Microsoft .NET 4.5.2 and if you don't have this installed then MySQL installer will show you a message to install Microsoft .NET Ver. 4.5.2 first.
You can download and install .NET 4.5.2 from this Microsoft Website
When everything is OK the MySQL installer will first ask you for your permission
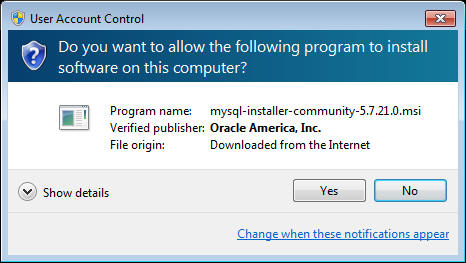
Once you click Yes, it will take some time and you will see a progress bar showing the status

Then MySQL installer will ask you to choose the type of installation. Choose the default Developer and click Next

Then MySQL Setup program will show a list of dependencies which are needed for several products. An example is shown below
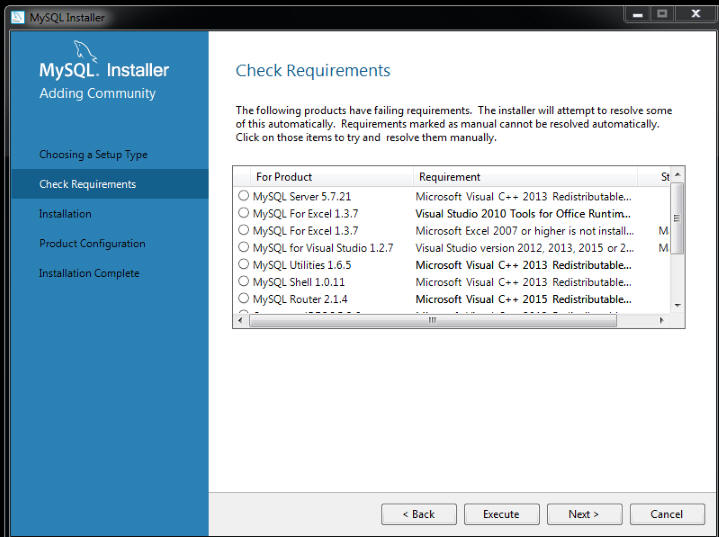
Most of the products depend upon Microsoft Visual C++ 2013 Redistributables. We need to install MS Visual C++ redistributables before installing MySQL Server.
The good thing is MySQL installer will automatically download and install these required packages. To do this select the first item from list and click Execute button in the bottom.
Once you click Execute button MS Visual C++ installer will start and you will prompted to accept the license terms. Click on the checkbox to Accept the license terms and click Install button
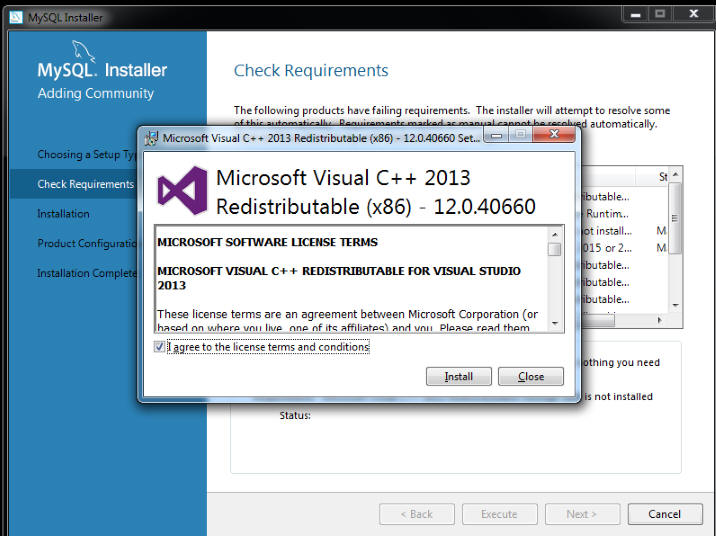
After clicking install, the setup program will automatically start several setup programs to install Microsoft Products, just go on clicking Install and Repair buttons.
Once all the dependencies are installed, the installer will show a screen similar to as shown below
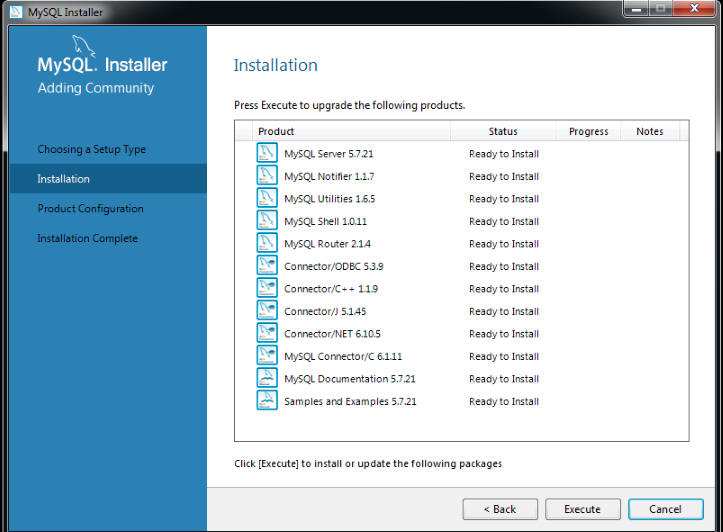
Now click Execute button to begin the installation of all these products.
The setup will take several minutes to install the packages and once done it will show a screen similar to shown below

Note that in my case all packages are installed correctly except one product MySQL Router which is not essential for me. Clicking next will prompt to configure the MySQL Server

Click Next button
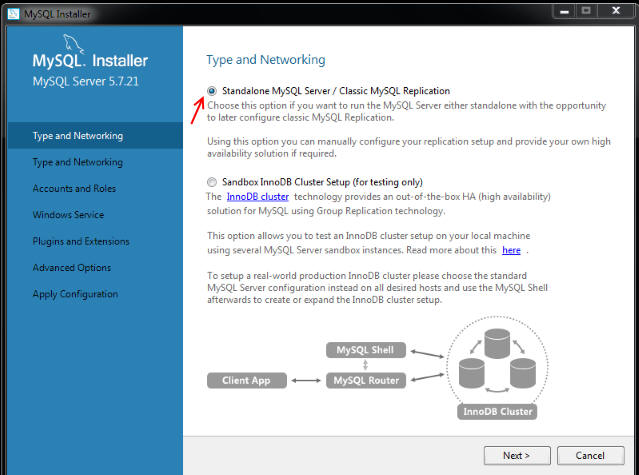
Choose Standalone Server and click next
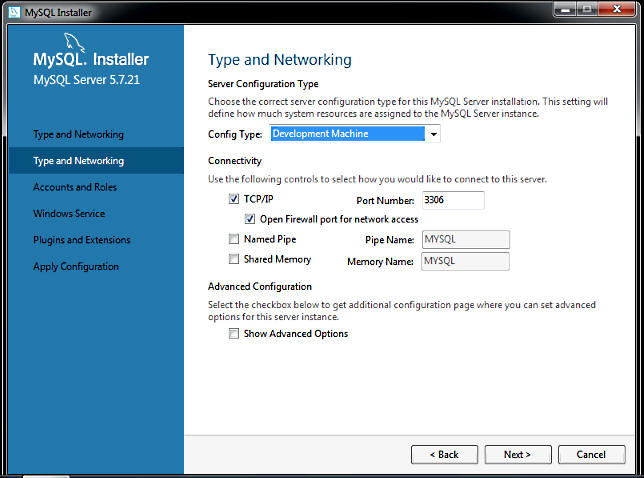
In the next screen you will be prompted to choose the server type and connection type. Choose the default "Development Machine" as Config type and choose TCP/IP protocol for connection type. Don't forget to check the "Open Firewall port for network access" checkbox.
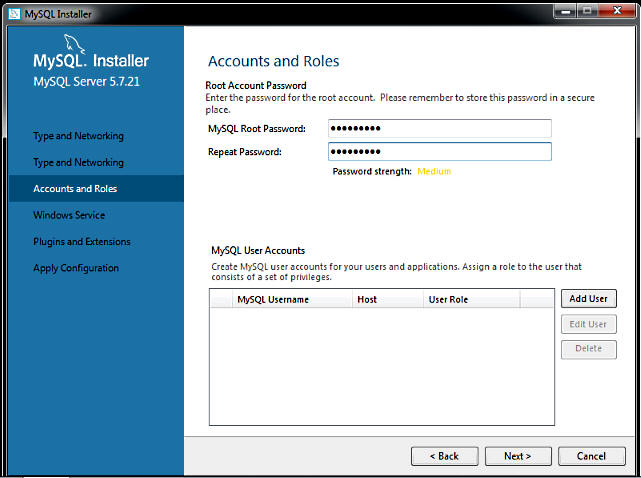
Next you will be prompted to choose a password for Root account. The Root account is the main account in MySQL and it has all the administrative privileges to manage MySQL Server. Here type your own password and don't forget to write it down some in case you forget it in future.
In the next screen MySQL will ask you to choose whether to start MySQL server automatically when you start Windows. And it will be very convenient for us to let MySQL server start automatically otherwise we will need to go to command prompt or go to Control Panel -> Services to start MySQL server manually.
Choose the default options and click next

Next you will be prompted to whether you need to install any Plugins or Extensions. We don't required any plugins or extensions right now so just ignore this screen and click next

Finally you will be shown a screen similar to below. Click Execute button to carry out all the configuration we have chosen in the previous screens.

Once you click Execute button it will take some time to process all the configurations operations and you will get a completed screen as shown below

That's it, we have now successfully installed & configured MySQL server. MySQL Server will now start automatically whenever we start Windows.
Click Finish to close the installer.
Next it will ask you to install and configure MySQL Example schemas and tables.
Click next to start installing the example tables. Then MySQL will ask you to enter the password for root account. Remember we have chosen the root password during MySQL Server configuration, enter the same password now and click check

After authentication succeed, the Next button will get enabled. Click Next

Click Execute button and then after sometime the process will get complete and you will see a window as shown below
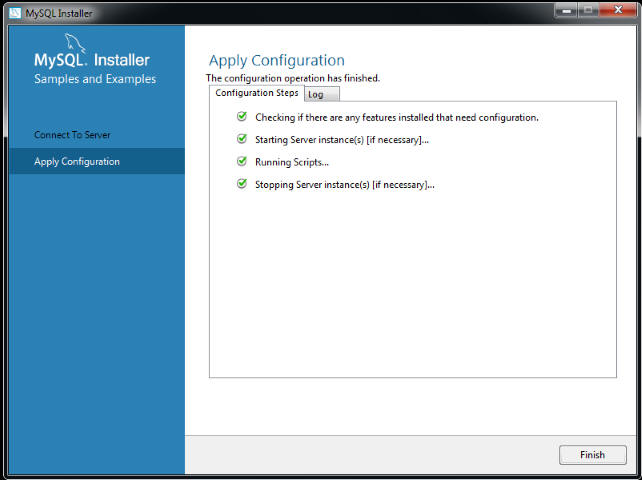
Click Finish button to close the configurator
Now the next step is to start interacting with MySQL and Create our first database for our learning purpose.
Interface Computers Academy © 2007-2017 All Rights Reserved